Visualization
The default visualization comes as a plugin of QMidiPlayer. So before using it you have to enable it first in the plugin manager.
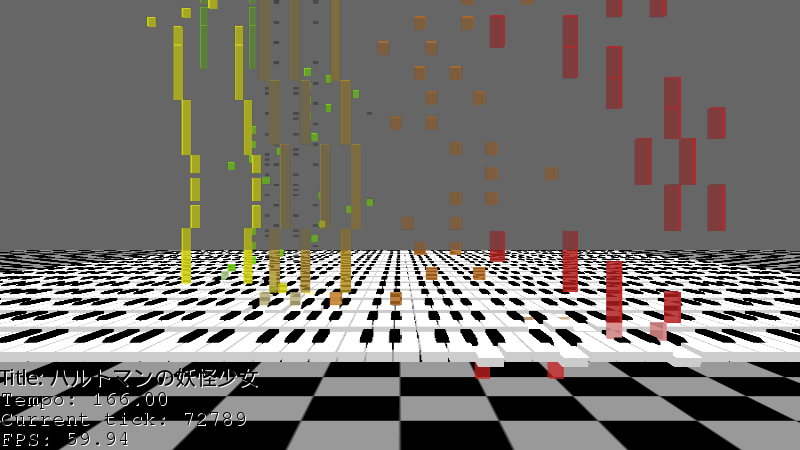
To use the visualization, click the Visualization button in the main window.
The visualization plugin adds two new option tabs.
Controls
- W: move camera forward
- A: move camera left
- S: move camera backward
- D: move camera right
- Q: move camera up
- E: move camera down
- Left arrow key: seek backward 1%
- Right arrow key: seek forward 1%
- Shift: seed 5% instead of 1%
- Left mouse button: hold and drag to orient the camera
Options
The options listed here are applied after closing and reopening the visualization.-
Visualization-Appearance
- Show Piano: Whether to show the virtual piano in the visualization scene. Currently drawing the piano is very expensive, so it is not recommended to enable this unless you have a beefy computer.
- 3D Notes: 2D notes are used when this is unchecked. Using 2D notes is less resource-hungry.
- Arrange channels on a stair: If checked, virtual pianos will be arranged on a stair-like shape. This option has no effect if virtual piano is not shown.
- Show channel labels: If checked, channel preset will be shown on the left side.
- Show particles: Whether to draw particles. Very resource-intensive!
- Horizontal Visualization: Uses a horizontal visualization style. Overrides everything above except 3D Notes.
- 2D Visualization: Tick this to use a simple 2D visualization instead. Much less resource-demanding.
- Use spectrum instead of piano roll: Draw spectrum-like bars over the piano.
- View distance: This option affects the maximum number of notes rendered on the screen. Only applies to the 3D visualization.
- Note stretch: The length multiplier of notes.
- Minimum note length: Avoid notes that are too short to be visible by adjusting this value.
- Chequer board tint (AARRGGBB): change the color of the chequer board background.
- Background Image: Use a background image instead of the default dull grey color.
-
Visualization-Video
- Enable VSync: Enable vertical synchronization.
- Save Viewport: Restore last camera configuration when the visualization is started.
- Window Width/Height: Change the window size. If the size equals to your screen size, the visualization will start in fullscreen mode.
- Target FPS: FPS limit of the visualization.
- Supersampling: Supersample anti-aliasing for the 3D visualization scene. 1 means no SSAA.
- Multisampling: Multisample anti-aliasing for the 3D visualization scene. 0 means no MSAA.
- FOV: Field of view.
- OSD Position: Change position of the on screen display, or simply disable it.
- Font size: Change font size used by the visualization. Useful for HiDPI screens.
-
Key-only options
Options listed here does not provide an entry in the option GUI. You have to add them to the configuration file manually if they don't exist in it.- px py pz rx ry rz (automatically created if save viewport is set to true): Doubles. Saves the last viewport. (px,py,pz): Position of the camera. (rx,ry,rz): Orientation of the camera.
- chActiveColor<channel id 0..15> : Unsigned 32-bit integers. Colors of sounding notes.
- chInactiveColor<channel id 0..15> : Unsigned 32-bit integers. Colors of normal notes.
Visualization Renderer
The visualization plugin comes with a standalone application that generates high quality rendering of a midi file.Command line usage
Usage: ./qmpvisrender [options] file
Renderer a visualization of a midi file.

Options:
  -h, --help                       Displays help on commandline options.
  --help-all                       Displays help including Qt specific options.
  -v, --version                    Displays version information.
  -f, --output-file <filename>     File name of the output file.
  --receiver <command>             Specify a program and its arguments to
                                   process the rendered frames. Supports
                                   parameter substitution. See documentation for
                                   details.
  -e, --receiver-execution <mode>  Execution mode of the receiver command.
                                   Valid options are 'one-shot' and 'per-frame'
  -s, --show-window                Do not hide the visualization window.
  -c, --config <qmprc file>        Load options from the configuration file.
  -o, --option <key-value pair>    Set option for the visualization module.
  --list-options                   Show a list of recognized options.

Arguments:
  file                             MIDI file to render
Basic usage
You will most likely to load your QMidiPlayer configuration file so that you can get the exact same results as viewed in QMidiPlayer. You should also make sure ffmpeg is ready to use. Then you can runqmpvisrender -c <path-to-configuration-file> <MIDI file to render>
and wait for the results. The output file is named output.mp4 and will be found
in the current work directory.
Supplementary materials for commandline options
When specifying a value for an option under the "Visualization" category, the category part in the key may be omitted, so "-o Visualization/wwidth=1920" would become "-o wwidth=1920".
The renderer performs parameter substitution before invoking the receiver command line.
| Placeholder | Substituted with | Remarks |
|---|---|---|
%w | width of an output frame in pixels | |
%h | height of an output frame in pixels | |
%r | framerate which the output frames should be played at | |
%i | input format specification for ffmpeg | shorthand for "-f rawvideo -pixel_format rgba -video_size %wx%h -framerate %r -i pipe:" |
%o | output file name specified by the --output-file option | If the receiver execution mode is "per-frame", "%f" in the output file name will also be replaced. |
%f | a six-digit frame number | only works if the receiver execution mode is "per-frame". |
To add a literal space in the receiver command, put a single backslash before the space. To add a percent sign, either put two consecutive percent signs or use a backslash followed by a percent sign.
The default receiver command is ffmpeg %i -vf vflip -pix_fmt yuv420p -c:v libx264 -preset slow -crf 22 %o.
In case the output quality doesn't satisfy your needs, consider lowering the number after '-crf' or selecting a even slower
profile ('slower' or 'veryslow').
How it works
Notice: you don't have to understand anything under this section to use this tool. You may try out the examples below or simply adhere to the basic usage shown above even this section makes zero sense to you.
The renderer feeds a sequence of images into one command or a series of commands that process the images through a pipe. That's it!
The data is a stream of raw RGBA values, where each color takes one byte in every pixel. The frame size is the same as used by the visualization module, and the frames should be played back at a fixed frame rate. The pixel data starts from the bottom-left of a frame and follows row-major ordering (so you may want to flip the frame when using the frame with some applications).
The renderer supports two modes of receiver program operation. If the mode is set to 'one-shot', the receiver is only started once and gets all rendered frames. If it is set to 'per-frame', the receiver will be started every time a frame is rendered, and will only get one frame to process.
Examples
If you wish to try these examples, make sure you have the required receiver program ready to run.
- Render to a vp9 encoded webm video.
- Render to a h264 encoded mp4 video with hardware encoding acceleration using VA-API.
- Render the frames into png files using imagemagick.
- Show the visualization window. Discard all rendered frames.
- Save the raw frame data.
qmpvisrender -c ~/.config/qmprc --output-file test.webm --receiver 'ffmpeg %i -vf vflip -c:v libvpx-vp9 -crf 30 -b:v 0 %o' <midi file>
qmpvisrender -c ~/.config/qmprc --output-file test.mp4 --receiver 'ffmpeg -vaapi_device /dev/dri/renderD128 %i -vf vflip,format=nv12,hwupload -c:v h264_vaapi -b:v 5M %o' <midi file>
qmpvisrender -c ~/.config/qmprc --receiver-execution per-frame --receiver 'convert -size %wx%h -depth 8 RGBA:- -flip pngout/%f.png' <midi file>
qmpvisrender -c ~/.config/qmprc -s --receiver 'dd of=/dev/null bs=24M' <midi file>
qmpvisrender -c ~/.config/qmprc --receiver-execution per-frame --receiver 'tee rawoutput/%f.raw' <midi file>